Wednesday, July 14, 2010

Learning to see…

Learning to see creatively is very dependent on what your camera and lens can and cannot see. Captains of ships need to become very familiar with their maps as they navigate the world, making certain to keep the ship pointed in the right direction. In much the same way, your lenses are maps that can lead you to new and enchanting lands. With constant practice, which will only come by placing the camera and lens to your eye, you’ll begin to visually memorize the unique vision of each and every lens—both the pluses and the minuses. The more you do this, the less likely you’ll be hearing yourself ask the question, “what lens should I use?” You’ll learn just how vast an area a wide-angle lens can cover, or how a telephoto lens can select a single subject out of an otherwise busy and hectic scene. It won’t be too much longer until you’ll find yourself knowing, without hesitation, what lens to use as you see one picture-taking opportunity after another.

Then, you can begin to take this new found vision to even greater heights, challenging yourself to view the forest from a toad’s point of view, or the city streets from a sidewalk point of view, or your backyard from a robin’s-nest point of view. (Ladders are not just for house painting.) Lie on your back at the base of a large fir tree and show me the point of view of the squirrel that raced up it only moments ago. Set your camera on the shoulder of the road, and fire away just as the big semi truck comes into view. A composition like this will, for example, make it dramatically obvious why it is so important that the city council build a small underpass for the ducks that cross that same busy road every spring.

Whether or not your compositions are compelling depends not on some magic recipe, but rather on a thorough understanding of lens choice, point of view, elements of design, and final arrangement, or composition. All of these are, as I said, “maps” that require studying, some more then others. Both your fears and preconceived notions will be challenged. How will you ever share with others the robin’s-nest viewpoint if you’re afraid of heights? How will you share the busy sidewalk view if the idea of lying down on the sidewalk is too intimidating? You’ll certainly hit a “reef” now and then, and you may even feel compelled to abandon ship at times.

What If. . . ?

Once you begin making discoveries about how your lenses see, don’t be surprised if you find yourself at times consumed by the question “What if. . . ?” What if you focus close on your toaster that just burnt the toast and, as the blue smoke rises from inside, we see your wife—with the baby in her arms—out of focus in the background, running towards it? What if you focus on a passport lying on the sidewalk and we see an obvious out of focus businessman getting into a taxi in the background? What if you focus on a bottle of sleeping pills with an out of focus woman asleep in her bed in the background? What if from inside the house or garage, you focus close on a broken window-pane with an out of focus solemn-looking little boy, glove and bat in hand, in the yard in the background? What if you focus on just the thumb of a hitchhiker on a busy interstate? What if you focus close on just the used syringe in an alleyway? What if you focused close just on the. . . ?

Our desire to see objects up close is innate- a longing for intimate encounters perhaps. And when we combine an up close and personal view of a given subject, we can in turn control the subjects “visual weight” via the proper selection in aperture. It is the aperture in combination with the close focus that determines the overall sharpness in a given scene. And in both of the finished examples shown here, focusing close and the use of a large lens opening, f/5.6, emphasizes the foreground flowers, and in turn the background is rendered into out of focus shapes and tones. It’s as if the flowers have been given a voice, a voice that says quite simply, “Look where I get to bloom!”

The very small village of Jarnioux, France is listed as one France’s Most Beautiful Villages and for good reason. I have shot in Jarnioux more then a dozen times, during all seasons and I never ceased to be amazed at making new discoveries here. As we can see in the first example, the village boasts an old church and castle, and along it’s nearby fields and roadside ditches one can often find wildflowers blooming in the spring and summer. After shooting the first image:


Nikon D300S-Nikkor 28-70mm F/5.6 @ a 1/800 second, 200 ISO

The thought then occurred to me, “What if I could show the village of Jarnioux from the flowers perspective, as if the flowers wanted everyone to know where they lived?” With the aid of my Nikkor 28-70mm f/2.8 lens I was able to move in really close to a single flower stalk and when combined with a large lens opening, I was able to give the flowers a voice.


Nikon D300S-Nikkor 28-70mm F/5.6 @ a 1/800 second, 200 ISO

As this second photograph shows, it’s as if the flowers are now exclaiming, “Look where I get to bloom!”

The Valensole Plain in Provence France is a lavender shooters paradise. Once you drive up on any number of small roads that lead to the top of the plain, you will be greeted with waves of lavender as far as the eye can see. It’s an area that is truly hard to take a bad picture! However, having shot ‘waves of lavender’ many times already, I was once again looking for something new. It was then I spotted these yellow flowers in a large expansive field of lavender.


Nikon D300S, Nikkor 70-300mm ED-IF VR, f/5.6 @ 1/1000 second, ISO 200

I new I could once again place the visual weight on these flowers and render the waves of lavender as out of focus shapes and tones in the background. Again, I was able to give the flowers a voice.


Nikon D300S, Nikkor 70-300mm ED-IF VR, f/5.6 @ 1/1000 second, ISO 200

As the second photograph clearly shows, “Look where we get to bloom!”

Get to know your lenses and their unique visions and instead of asking what lens should I use, you will soon be asking “what if…”

Friday, June 25, 2010

Every photograph is a 'lie', yet within that 'lie' is a mountain of truth, a truth that is perhaps best defined as "The Sizzle!"

As you may recall, a few days ago, I raised the question of 'integrity' when it comes to the dramatic alteration of one's photograph via Photoshop. In case you missed it, I have uploaded both of the photographs again and the image on top is the original while the image below was altered via Photoshop; namely I replaced the foreground grasses and distant road with another photograph that included a foreground of a sandy beach.

I received more than 450 emails to my question, "Do we have an obligation to tell the viewer when a photograph has been dramatically altered in Photo-Shop?" and the votes are now in!

Before sharing with you the results of this unscientific survey, many of you made it clear that there is only one area in photography that is deserving of the "death penalty" if one is found to have dramatically altered an image and that is the area of Photo-Journalism/Documentary Photography. But, and to my amazement, 41% of you felt that when a photographer dramatically alters an image he or she is NOT obligated to tell anyone, unless asked. And a few of you even stated, that if asked, you would simply say, "That's none of your business!" There were a variety of reasons why most felt they had no obligation to tell anyone if the image was dramatically altered, but suffice it to say, all of the reasons could be easily quantified as "artistic license".

Personally, I have NO problem with any image that has been dramatically altered, as long as it is 'believable' OR so obviously altered that it's not even a question e.g. fantasy, dream-like photographs. I don't mind the 'lie' that is created from a dramatically altered image, since I have felt for years that every photograph is a 'lie' anyway, but my problem with the dramatically altered 'lie' is that it can lead one to believe that a given landscape or cityscape really does "look like that" when, as it turns out, there is no such place on earth.

Several years ago, I came upon a really beautiful image of a street scene in Paris. It was an image I saw on a photographers website. In the foreground was the street sign, Rue Ravoli. A few weeks later I was in Paris and I tracked down this 'street' and as you might have guessed, the street I vividly recalled in the photograph was nothing like the street I was standing on. There were only two buildings that I recognized and everything else on that street was an obvious composite of other shops and cafes that were probably taken in other parts of Paris. On a strictly personal level, I tipped my hat to the photographer who obviously possessed some terrific Photo-Shop skills. It was clearly one of the best Photo-Shop composites I had ever seen. But, on the other hand, I was disappointed that such a place did not exist, if only because I wanted to see what I might be able to do, photographically, on that same street.

If you know me at all, I am 'old school'; I am a big fan of "getting it right in camera". For the longest time I have taken great pride in meeting the personal challenge of creating unique images and since the advent of Photoshop I have at times felt quite smug, knowing that I got 'that' image without the use of Photoshop. I love it when someone asks, "Did you do 'that' in Photoshop?" and with the biggest smile across my face, I say, honestly and often emphatically, "Nope, it was all done in camera!"
Since last week however, I now find myself thinking about my "get it done in camera" attitude and I must confess, I have now come under my own suspicion!

How many times have I 'dramatically altered' a scene before actually photographing it? In 35 years of shooting that answer would be at least a few dozen times, I am sure! One such scene that I recall vividly stands out more than any other and ironically it also involves a city street, a city street that was dramatically altered, all for the sake of a photograph. I was hired by an advertising agency to photograph a European street scene, complete with a Bakery, Café and a Newsstand. I scouted various locations and hired set-builders, stylists and of course 'European' models and several weeks later the shot of the European street was taken in the early morning hours in downtown Portland, Oregon!

The shoot itself lasted about two hours and by that afternoon, all that was left of the European street scene were 11 rolls of 36-exposure slide film. The 'lie' had been successfully recorded and now that 'lie' would continue as the State of Oregon Tourism Dept. began running two-page spread advertisements in many national magazines, promoting Portland as a European city alternative.

This is of course my most extreme example of being party to a dramatically altered image. Clearly, most shooters don't think twice about dramatically altering the scene before them, as long as any changes are done before they take the picture. Why is that approach any less 'dishonest' than the dramatically altered images done by others with the aid of Photoshop? As for me, I had been struggling with that question all week.

What if I make only minor alterations to a scene before I take the picture? Am I still 'guilty' of altering an image if I ADD or SUBTRACT just a few things? The image above has been altered. How has it been altered? I placed the leaf you see on that rock there, in full view of several of my students. Does it look 'natural', believable? Before answering that there is another part of this story that you need to hear. Within ten minutes of placing that leaf on this rock, several other photographers who were not part of my workshop had arrived in the same area, and myself and several of my students overheard the following remark made by one of the photographers, "Wow, check out the leaf on the rock!" And without hesitation both of these photographers set up their cameras and tripods and fired away. As far as they were concerned, the leaf that on that rock was natural!

The debate over 'natural' or 'altered' images is really OLD NEWS! In fact it can be argued that every lens choice, every point of view, every 'creative exposure', every filter, to name a few from the list, are all guilty of 'altering' an image. As far as I am concerned, you can even add the mere act of framing the image in-camera as another example of altering an image! Let's look at several examples and see if you don't agree.

The image you see here has been altered dramatically, yet I will add that it was altered 100% in-camera and without the aid of Photoshop, NOT that that should matter! It was altered 100% by LENS CHOICE, POINT OF VIEW and a LARGE LENS OPENING. We can all agree that the woman you see here is probably of Middle-Eastern descent, but after that, it's anybody's guess what the rest of the story might be.

One thing is sure. Without benefit of the photograph below, you would have never guessed that this image was made in a nursery next to a trailer, and with the aid of an assistant who is reflecting some warm light onto her face. In addition, the model did not have the right pins to hold her headscarf in place so she had to use one of her hands to hold the headscarf in place while I took the shot! With the telephoto lens and a large aperture, I was able to render a shallow depth of field AND with the right point of view I was also able to avoid recording any part of the trailer in the background. When we consider the subject and the surroundings, there is no question that I have dramatically altered the scene to get to my end result.

One more example and I will then turn this debate over to you. In the photograph below we see a woman in a red sweater, doing her laundry, along with several other women in the background, walking in the shadows. Once again, it's anybody's guess what the rest of the story might be, but rest assured, the image you are looking at has also been 'dramatically altered'. It is an image that was cropped, in camera, by the use of a long telephoto lens and further 'altered' by manipulating a deliberate in-camera under-exposure so the shadows would go black. And again, not that it matters, but this image was also done in-camera.

As you now have the benefit of the 'bigger' picture below, it becomes readily apparent that the above image was indeed altered. Again, with my telephoto lens, I was able to cut through the surrounding 'clutter' and arrive at what I determined to be the much cleaner composition in the photograph above. So, again, by the mere act of LENS CHOICE, I have created a compelling composition of a very small part of the larger scene before me. Like it or not, I am once again, guilty of altering an image.

Every photograph is a 'lie', yet within that 'lie' is a mountain of truth, a truth that is perhaps best defined as a "The Sizzle!"

Years ago, like many photographers who are just starting out, I needed to have a 'real' job to support myself initially. One of those jobs was selling insulation and storm windows to homeowners and I remember the sales manager's advice to all of us in our weekly sales meetings-"Sell the sizzle not the steak!" In other words, appeal to the customer's emotions (the"sizzle") and when you sell the sizzle, most customers will be quick to buy the steak!

When I think about memorable photographs, images that truly do leave a lasting impression, it's fair to say they all have a common thread. They are images that "sizzle", they are images that excite or ignite the emotions of the viewer.

Your camera's viewfinder, combined with a given lens choice, point of view and an understanding of light, exposure and composition fundamentals, is able to record an image of great emotion, regardless of the overall truth that was surrounding the image.

I can think of countless images I have taken that suggested 'peace', 'joy', 'elation', 'sensuality' or 'sorrow'. Yet, if you saw the 'big picture', your reaction might be quite different. Prior to the digital age we now live in, all photographs were made with film and for those of us who shot color slide film exclusively, myself included, a cloud of suspicion rarely hung over us. (Make note of that word 'suspicion'.)
Since the digital age, and with greater frequency, the emails I receive from readers raise the question, "Did you do that in Photoshop?" It is a fair question, and for the most part, the answer is no, but the fact remains, a cloud of suspicion is a constant in my photographic life today as it is or many other shooters. However, just this past week, I have concluded, that it has been my attitude towards "dramatically altering an image in Photoshop" that is behind this cloud of suspicion because I, like so many others have been preaching for way too long that it is somehow far more noble and far more an indicator of one's creativity if you can get the shot in camera! Yet, as I have just shared with you, I now realize that I have been altering images, sometimes dramatically, in camera for years, but what is the difference between doing it in camera or in Photoshop? Seriously, what is the difference!? I am not only 'guilty' of altering images for years, but also equally 'guilty' of arrogance!

Going forward, I will continue to use the same barometer I have used for years when looking at the work of other photographers; "Does this image make me feel, does it excite or ignite my emotions, does the image sizzle? Whether or not its 'real' or believable is really NOT important, (crime scene photographs, passport and drivers license photographs being the exception!)

And if and when I start dramatically altering images with the aid of Photoshop, I will be the first to answer, "Yes I did!" should anyone ask if I did that in Photoshop. I finally understand that for many shooters, Photoshop is their main tool for creating much of their compelling imagery. And if it's Photoshop that accounts for much of your "sizzling" work I'll still gladly be buying your steak!

To be clear I am a big believer in getting most if not all of my 'dramatic alterations' done in-camera; moving objects, adding objects, subtracting objects, creating blur, adding sharpness, seeking out appropriate backgrounds, manipulating exposure, or the occasional use of my flash to create sunlight and of course focusing on the final arrangement, (lens choice and point of view), which will result in the most effective composition. My reason is a simple one: doing my dramatic alterations in-camera is simply quicker than the hour or so I might need to do the same thing in Photo-Shop.

And finally in closing, I wanted to share with you another example where, truth be told, I have dramatically altered the image. My first dramatic alteration to this scene was adding a seashell, on its side no less, to an otherwise empty oasis of sand. My second dramatic alteration was adding light where NO light ever existed, thanks in large part to a small flashlight. My third and somewhat less dramatic alteration was setting my White Balance to Incandescent/Tungsten. This made the overall scene blue. My fourth and even less of a dramatic alteration was the use of a full frame fish-eye lens. Dramatically altered? You bet, but hey, at least I didn't use Photo-Shop-LOL!

Yes, let me know your thoughts if you feel compelled to share them in the comments below!

Monday, June 21, 2010

A Photographic Challenge

On a recent workshop in Cape Cod, my students and I had just parked our cars at a beach wayside parking lot and excitement filled the air! All of us would soon be facing one of several challenges that this weekend workshop presented.

When we think of a lighthouse, images of the lone sentinel are often associated with bluffs, cliffs or beach or a rocky out-cropping, often surrounded by pounding ocean surf.

Well, as you can clearly see in the first photograph, this particular lighthouse was nowhere near any beach or pounding surf. In fact, I remember commenting to myself upon seeing this particular lighthouse "Whose idea was it to build a lighthouse in the woods?"

Most of the students walked ahead of me, proceeding across the street and up the small trail to the lighthouse. I and one other student stayed behind, as I felt the ONLY real shot worth taking here would be from the grassy area, where you can see a lone tea cup rose bush-(note the area that I have boxed).

Combining my Nikkor 12-24mm lens with the Canon 500D close-up filter, I was able to move in really close to a single rose bloom and frame up the scene you see here.

My initial reaction to this particular composition was fairly positive, BUT try as I might, I could not find a point of view that would allow me to 'lose' the roadway that is visible in the background. I did choose to shoot at a wide-open aperture, but even at wide open, (f/4) I was still unable to blur out the "unsightly" road in the background.

I did play around a bit with the Clone Tool in PS but that did nothing more than reveal a composition that now looked like I was trying to hide something. What's a photographer to do at a time like this?

At that moment I was struck with an idea as I recalled taking a number of beach landscapes the previous afternoon at a different location. You can see one of those beach landscapes here.

This particular image was also shot with my 12-24mm but at an aperture of f/16 and not surprising, unlike the wide-angle shot of the tea rose above, this image is super sharp, from front to back due to the use of the smaller aperture of f/16.

It was then that I got the idea! What if I were to combine the beachscape image with that of the lighthouse and tea rose? I would of course need to 'blur' the beachscape image so it would 'match' the natural blur of the lighthouse/tea rose image and once that was done, (using Gaussian Blur Tool in PhotoShop) I could then combine them and with the aid of a layer mask, "paint" this blurry beachscape into the lighthouse/tea rose scene and voila-that's exactly what I did!

Here is that image for all to see (If you don't know a thing about LAYERS, get signed up for Jon Canfeld's class-NOW!)

Assuming you have the knowledge on how to do a layer mask and assuming this was your shot, do you feel your viewing audience has the right to know that this image is a composite OR do you feel that it's nobody's business and unless someone asks, no one needs to know? If you have time comment here and let's get the discussion going!

Wednesday, January 13, 2010

Craigslist Scam

IF YOU ARE RESPONDING TO AN AD ON CRAIGS LIST THAT SAYS I AM LOOKING FOR AN ASSISTANT, DO NOT RESPOND TO IT AS IT IS A SCAM!!! CONTACT CRAIGSLIST AND FLAG THE AD IMMEDIATELY.

Thursday, October 15, 2009

Tips on composition

TIPS ON COMPOSITION

Following our weekly lessons here at PPSOP (www.ppsop.com), a weekly assignment is given to every student. This past week, after reviewing the work turned in from Assignment Six in our Understanding Exposure class, I was reminded again of just how much beginning and intermediate photographers need to be ever mindful of two compositional principles as they work towards the goal of creating the Perfect Picture.

Principal one:

Keep a watchful eye on the background!

Anyone who knows me, will attest to my unwillingness to head out the door to shoot wildlife. I can be patient, but NOT when it comes to waiting on wildlife to “do their thing”. And even if they “do their thing” e.g. the Bald Eagle swopping down across the bay to grab a salmon, there is no guarantee that at that moment I am lucky enough to have the right lens, the right light and/or the right point of view. Animals are more unpredictable than a roomful of two year-olds.
However, when I heard about a “rain forest” like setting in a 4-acre netted enclosure (complete with more than 40 different tropical bird species and bird feeding stations) I reconsidered my position on this matter and sure enough, like many other shooters, I was soon ‘feasting’ on tropical birds in a natural setting at the Jurong Bird Park in Singapore.

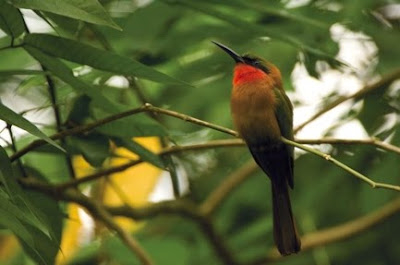
In this first image, do you see that the background is filled with ‘contrast shifts’? Note the large white globs of light to the right and left of the bird and the yellow glob of tone to the left of the bird. These two contrast shifts cause the eye to jerk away from the real hero of the shot, the bird.
Have you ever been in a movie theater and during the show, someone heads out the exit door into the afternoon bright light? That sudden shift in contrast, dark to bright light, gets your attention really quick! And so do the two contrast shifts we see here.
The solution in this case was not only a simple one, but it leads into the second tip towards better compositions: turning the camera vertically! As you can see in this next photo, I turned the camera vertically and moved a few inches to the right and this simple solution cleaned up the white and yellow contrast shifts. Now the eye is free to relax and enjoy the ‘movie’! (Nikon D300 with Nikkor 200-400mm lens at f/5.6 at a 1/640 second ISO 200)

Principal two:

When is the best to shoot a vertical? Right after you shoot the horizontal!


Not all of the time—but most of the time—you can compose each and every subject in either the horizontal or vertical format. It may take some moving around, shifting your point of view, moving closer or backing up, or even changing a lens. But, the benefits of shooting your subject in both formats are obvious.
Benefit number one is that when you crop that horizontal into a vertical IN camera, you won’t see a loss in image quality since you still have the same amount of pixels! Cropping a vertical out of a horizontal via your computer will ALWAYS mean a loss in image quality since you have just “thrown away” about half of your pixels and without the needed pixels that vertical image will make it as a high-quality enlargement.
When you get in the habit of shooting the vertical, in camera, right after you shoot the horizontal, you’ll of course be spending less time on the computer, allowing you more time to shoot!. Additionally, should the day ever come when you wish to sell you work, you’ll be more than ready: Should a client express interest in one of your horizontals and then ask if it is available in the vertical format, you can meet the demand and, thirty days later, deposit that check for your first magazine cover!

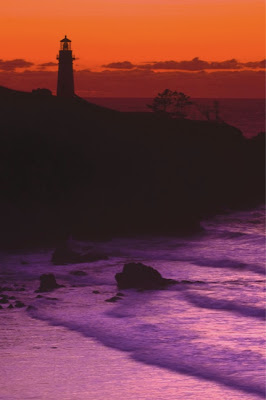
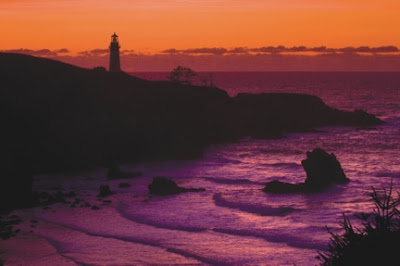
Yaquina Head Lighthouse is one of the most photographed lighthouses along Oregon’s Coast, but when looking at the many images that hang in the Coastal Art Galleries and on postcard racks, rare is the sighting of a vertical of this proud and dignified beacon of light. And such is the emotional message of the vertical frame; it is proud, dignified, active and no doubt “going places” in contrast to the horizontal frame whose message is calm, tranquil and restful.
With my 70-200mm Nikkor lens mounted on tripod, combined with my Lee 3-stop GND filter and my FLW magenta filter, I first shot the horizontal and than quickly followed up with the vertical. (Both exposures were shot at F/11 at a ¼ second with 200 ISO)


All my best-
Bryan F Peterson
bryanfpeterson@mac.com
Founder/PPSOP

Friday, September 4, 2009

New How to Video Streams up at PPSOP

I have just uploaded 2 new video streams to PPSOP that I think you will really enjoy!

Click here to see them or go to

http://videos.ppsop.com/index.html


Bryan F Peterson
Founder PPSOP.com

Friday, August 28, 2009

Language of Seeing

AGREE OR DISAGREE-
THE FOLLOWING TWO LOCATIONS ARE ABSOLUTLEY, POSITIVELY, WITHOUT A DOUBT, FULLY CAPABLE OF OFFERING UP TWO TRULY COMPELLING IMAGES?


IF you don’t agree then perhaps you aren’t quite fluent in the foreign language of seeing creatively. Let me explain. I have lived abroad on two separate occasions. From 1989-1991 I lived in Bavaria, Germany and Amsterdam, Holland and from 1999-2008 I lived in Lyon, France. Fortunately for me, 88% of Dutch people speak fluent English so my stay in Holland was less challenging, but not so in Germany and definitely not so in France. Needless to say my challenge would be to communicate my needs, hopes and desires in a foreign language IF I truly wanted to integrate myself into their respective cultures. A daunting task perhaps, but there is nothing like the full immersion method. Just like throwing a baby into a swimming pool where it quickly learns to swim, I too quickly learned ‘how to swim’. The few phrase books I had brought with me were quickly retired, not because I had mastered the language, but rather because no one seemed to speak in the phonetic manner that these phrase books suggested. But in well under 3-months, I was soon speaking just enough German and French to get myself both in and out of trouble! As the months continued to unfold, my confidence took a sharp turn upward as I could sense my adventure on foreign soil was moving forward at a much faster pace and, as the saying goes, the rest is history.

And what does any of this have to with learning how to see creatively? EVERYTHING! Truth be told, your camera and lens(es) are a foreign country, a country where your camera and lens(es) do speak a language all their own. Until you are willing to learn the language your lenses speak, fluently I might add, your attempts at picture making will require constant translation.

Some of us can pick up the language of ‘seeing creatively’ quicker than others but I also believe that if given enough time everyone can speak the language of ‘seeing creatively’. I have seen and taught too many students to believe otherwise. And the road to speaking and seeing fluently is made much shorter when you put the language of your lenses to work, week in and week out. Obviously you won’t become proficient at speaking French if you go to one French class a year or visit only Paris for two weeks every five years. The same is true in learning to see creatively; visual fluency requires weekly practice.

Are you ready for lesson #1? Do you know what language your wide-angle lens speaks? Are you even sure you have a wide-angle lens? How close can it focus? What is its maximum angle of view? These questions need your answers and they can only be answered of course when you put the camera and lens up to your eye!

Today most if not all shooters are running around with at least one variable focal length lens, the “street zoom” as I call them, e.g. 18-70mm, 17-40mm, 24mm-105mm etc. and with a lens like that there is no excuse why you can’t be banging out one prize winner after another-no excuse at all!

Assuming that you have one of those “street zooms” and depending on its focal length, set the focal length to either 17mm or 18mm or 24mm and make a point to not change this focal length at any time during this exercise. Now choose a subject (a favorite barn or oak tree) or take your spouse, friend, or child into the backyard or over to the local park. From whatever distance is necessary, place your subject so that it falls in the middle of the frame, allowing for a lot of “empty space” above, below, and to both sides. With the camera still at your eye, make your first exposure and then begin walking toward your subject. Every five paces, take another exposure, mindful of course to keep the subject in focus. Keep walking closer until your lens can no longer capture the subject in sharp focus.

One thing is sure to result from this exercise. Your first composition will record not only your main subject, but also all of that other stuff that probably detracts from it, and your final composition should record a close-up of your subject, which not only cuts out that other stuff but maybe cuts out some important stuff, too.

Now, without changing the focal length, repeat the exact same exercise while on your knees and then again while on your belly. Finally, once you’ve gotten as close to your subject as you can, and making that last shot while on your belly, turn over onto your back and take just one more shot while shooting straight up.

While walking on your knees, you no doubt discovered a far more intimate portrait of the small child or perhaps recorded a far more intimate “portrait” of the barn that had the added drama of depth and perspective since the field that surrounds it now fills up the foreground of the image. Perhaps also, while on your belly, you discovered a wonderful and fresh composition of the surrounding park framed through the feet and lower legs of your friend or spouse. And, most of all, you learned the inherent vision, when combined with differing points of view, of your ‘street zoom’ and that includes everything it can and can’t do.

But, you’ve only just begun! Make a point to do the same exercises at 24mm, 35mm, 50mm, 60mm, 70mm, 80mm, 90mm, and 105mm. Switch over to your tele-zooms and start this exercise all over, shooting at various focal lengths up to 200mm (or 300mm if you have it). If you maintain this regimen of “eye exercises” once a week for the next six months, you will soon be speaking the visual language of your lenses, fluently!

And when you are fluent in seeing creatively, you will see the two compelling images that are yours for the taking
from the above two images.

Image#1-Nikon 300D, Nikkor 70-200mm at 200mm at f/5.6 at a 1/60 scene.

Image #2-Lecia D-Lux 4 in close focus mode, f/4 at a 1/60 second.


Your lenses are anxious to share their unique language with you! Why not get started today!?


All my best-
Bryan F Peterson

Tuesday, July 28, 2009

Correct Exposures-VS-Creatively Correct Exposures

By Bryan F Peterson
Founder PPSOP.com

Did you know that most picture taking situations have at least six possible combinations of f/sops and shutters speeds that will ALL result in the ‘same’ correct exposure? Furthermore, did you also know that despite having six possible correct exposures only one, maybe two, would be the ‘creatively’ correct exposure?
Every ‘correct’ exposure is nothing more then the quantitative value of an aperture and shutter speed working together within the ‘confines’ of a predetermined ‘ISO’. For the sake of argument lets say we are both out shooting some flowers in a meadow and we are both using a film speed of 100 ISO and an aperture opening of f/5.6 and whether we are shooting in manual mode or aperture priority mode the light meter indicates a correct exposure at 1/250 second. What other combinations of aperture openings (f/stops) and shutter speeds can we use and still record a ‘correct’ exposure? If I suggest we use an aperture of f/8 what would the shutter speed now be? Since we have cut the lens opening in half (f/5.6 to f/8) I will now need to double my shutter speed time to a 1/125 second to record a correct exposure, (1/250 sec + 1/250 sec= 2/250 which equals a 1/125 second). On the other hand, If I suggest that we use an aperture of f/4 what would the shutter speed now be? Since we have just doubled the size of the lens opening (f/5.6 to f/4) I will now need to cut my shutter speed in half (1/500 second) to record the same ‘quantitive value exposure’.
Now let’s put this into practice and pretend that nine of us have all got together for an evening of shooting. We break into three groups. One third of the group will shoot this night scene at f/4 for at a ½ second, the other third will shoot the scene at a f/8 for two seconds while the remaining third of the group will shoot the scene at f/16 for 8 seconds. You know what? All of us just shot the exact same CORRECT EXPOSURE! Even though each group’s f/stops and shutter speeds were different, the end result was the same; all three groups recorded a correct exposure. However, it’s very clear in this case, that the group, which shot the longest exposure, ended up with the most exciting composition!

f/4 for 1/2 sec

f/2 for 2 sec

f/16 for 8 seconds

Tuesday, July 14, 2009

Duct Tape

I was recently hired to shoot a series of images for a company called FLEX Solutions in Orange County California. FLEX Solutions is an industry leader in the area of 3rd party logistics and their goal was to convey their speed and efficiency to their clients. Motion-filled images were the ultimate goal and the obvious solution towards recording these motion filled images would involve some rather precarious camera positions.
Among the 1520 images I shot over the course of two day’s, about 30% of them of them required attaching the camera to several of the many lift trucks that operated inside their 200,000 sq. foot warehouse. Ask any commercial photographer what one vital tool of their trade is, and the answer will be ‘duct tape’ and on this particular shoot, duct tape was once again KING! With my tripod at full extension, I was able to jam the lower 18” of the legs in between the pallet of Dole Pineapple and after wrapping the legs and portions of the pallet in duct tape, I was “off to the races”.


With my camera and 12-24mm lens mounted securely to the tripod head and as the lift truck driver drove between the many rows of products, I walked in a hurried pace, firing the camera with the attached cable release. With the camera in Aperture Priority mode and with my aperture set to f/22, my exposure times varied between ¼ second and 1 full second. (The light values would vary as the lift trucks ventured down different aisles.) In addition, due to the tungsten lighting that was in the ceiling overhead, I had set my white balance to TUGNSTEN. A number of exposures turned out quite well that day and if I could offer just one piece of advice, duct tape would be it!

If you want to see more of this check out our huge selection of classes at www.PPSOP.com

Wednesday, July 1, 2009

Welcome To My New Blog!

Hello everyone, and welcome to my new blog! I finally decided to move into the 21st century, and created this blog to keep you informed of my current and upcoming on location photography workshops that I teach all over the world.

I will also be updating the blog with announcements, news, tips, tricks, and just about anything and everything to help take you photography skills to a whole new level.

I want to thank you for taking the time to visit, and hope to see you out on location someday!

All my best,
Bryan F. Peterson